Korg EXB-RADIAS for M3 Owner's manual, Page 28

1

2

3

4

5

6

7

8

9

10

11

12

13

14

15

16

17

18

19

20

21

22

23

24

25

26

27

28

29

30

31

32

33

34

35

36

37

38

39

40

41

42

43

44

45

46

47

48

49

50

51

52

53

54

55

56

57

58

59

60

61

62

63

64

65

66

67

68

69

70

71

72

73

74

75

76

77

78
Parameter guide
20
0–7: Sampling/Audio In
Here you can make settings for analog/digital audio signal
input (Analog, S/P DIF), and make settings for sampling in
Program mode.
For details on the available parameters and menu
commands, please see “0–7: Sampling/Audio In” on page 8
of the M3 parameter guide.
0–8: Control Surface
The Control Surface is the set of 8 sliders and 8 switches to
the left of the display. It looks like a mixer, but it can do
other things as well, including editing sounds, controlling
KARMA, and sending MIDI messages to external devices.
This page shows you the current values for each of the
sliders and switches, along with information about what
they are controlling. For instance, you can:
• Control the volume, Play/Mute and Solo On/Off
settings for RADIAS oscillators and the drum track.
• Modulate sounds and effects using the sliders and
switches.
• Control KARMA, and select KARMA scenes, using the
sliders and switches.
• Edit sounds using Tone Adjust.
• Assign sliders and switches to different Tone Adjust
parameters.
Control Assign Switches and parameters
You can switch the Control Surface between its different
functions using Control Assign on the display, or the front-
panel Control Assign switches. The parameters on the
display and the front-panel switches mirror one another;
when you change one of them, the other changes as well.
In Program mode, you can select one of five different
functions:
MIXER (OSC Mix): The control surface will control the
volume, Play/Mute and Solo On/Off status for RADIAS
oscillators and the drum track. (In Combination mode and
Sequencer mode, you can use this switch to alternate
between timbres or tracks 1–8 and 9–16.
MIXER (Mixer Input): The control surface will control the
audio input volume, Play/Mute and Solo On/Off status of
the analog inputs, S/P DIF inputs, and FireWire inputs (if
the EXB-FW is installed).
REALTIME CONTROL (RT Control): Use the sliders to
control the sound or effects. Use the switches to turn effects
on/off.
EXTERNAL lets you send MIDI messages to external MIDI
devices. Use the GLOBAL P1: MIDI– External Mode 1/2
page to specify the MIDI message that will be transmitted.
TONE ADJUST gives you hands-on access to sound
editing, using the sliders, and switches.
KARMA: Use the sliders and switches to control the
KARMA function.
You can freely change back and forth between the different
functions, without losing any of your edits.
For control surface functionality other than MIXER (OSC
Mix) and TONE ADJUST, please see “0–8: Control Surface”
on page 20 of the M3 parameter guide.
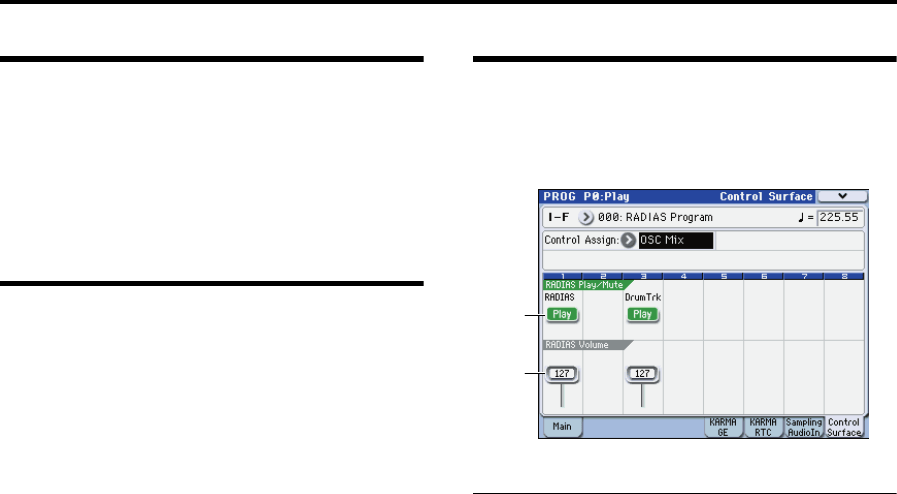
OSC Mix
In OSC Mix you can switch the Play/Mute and Solo On/Off
status of the RADIAS oscillators and the drum track.
0-8c: RADIAS Play/Mute
OSC Play/Mute:
MIX PLAY/MUTE 1, 3 switches
The MIX PLAY/MUTE 1 switch will mute RADIAS
oscillator. This is convenient when you’re editing a RADIAS
program. The 3 switch mutes the drum track.
The switch LED will light to indicate Play status, or be dark
to indicate Mute status.
RADIAS [Play, Mute]
When this switch is on (LED = on), RADIAS oscillator will
play. When the switch is off (LED = off), RADIAS oscillator
will be muted.
DrumTrk [Play, Mute]
When this switch is on (LED = on), Drum Track will play.
When the switch is off (LED = off), Drum Track will be
muted.
OSC Solo:
If the menu command Panel-SW Solo Mode On is checked,
the switches will control Solo for the respective item. Solo
operation applies to the RADIAS, drum track, and mixer
inputs.
Panel-Switch Solo Mode On and MIX PLAY/MUTE
1, 3 switches
Use the menu command Panel-Switch Solo Mode On to
specify whether the MIX PLAY/MUTE 1, 3switches will
control Play/Mute or the Solo On/Off. If Panel-Switch Solo
Mode On is on (checked), the switches will control Solo
On/Off.
Tip: You can turn Panel-Switch Solo Mode On on/off by
holding down the ENTER switch and pressing numeric
switch 1.
RADIAS Solo [Off, On]
Switches the Solo status on/off for RADIAS oscillator.
Drum Trk Solo [Off, On]
Switches the Solo status on/off for the drum track.
Note: Solo applies to oscillators 1 and 2, the drum track, and
the audio inputs.
Note: OSC2 Solo cannot be set for a program whose
Oscillator Mode is Single or Drums.
0–8c
0–8d